¶ INSTALLATION OF ACCESSORIES AND PIPING
¶ INSTALLATION OF THE MIXING UNIT
- This section applies to the mixing unit for the water heater and water cooler.
- The Installation and Service Manual is included in the mixing unit package or can be downloaded here:
mixing_nodes_usjr_pi-usj-r17-02-a.pdf - This manual contains the information required for safe installation, commissioning and maintenance.
If the unit is installed outdoors, it is recommended that the mixing unit be placed in a vacant chamber downstream of the heat exchanger. This must be taken into account when designing the unit, and the required free space must therefore be incorporated into the heat exchanger chamber or provided as a separate chamber.
An example of installing the mixing unit inside the chamber is shown in the following figure:
- Fasten the mixing unit to the vertical supports using pipe clamps.
- The operating position of the circulation pump must comply with the requirements specified in its manual.
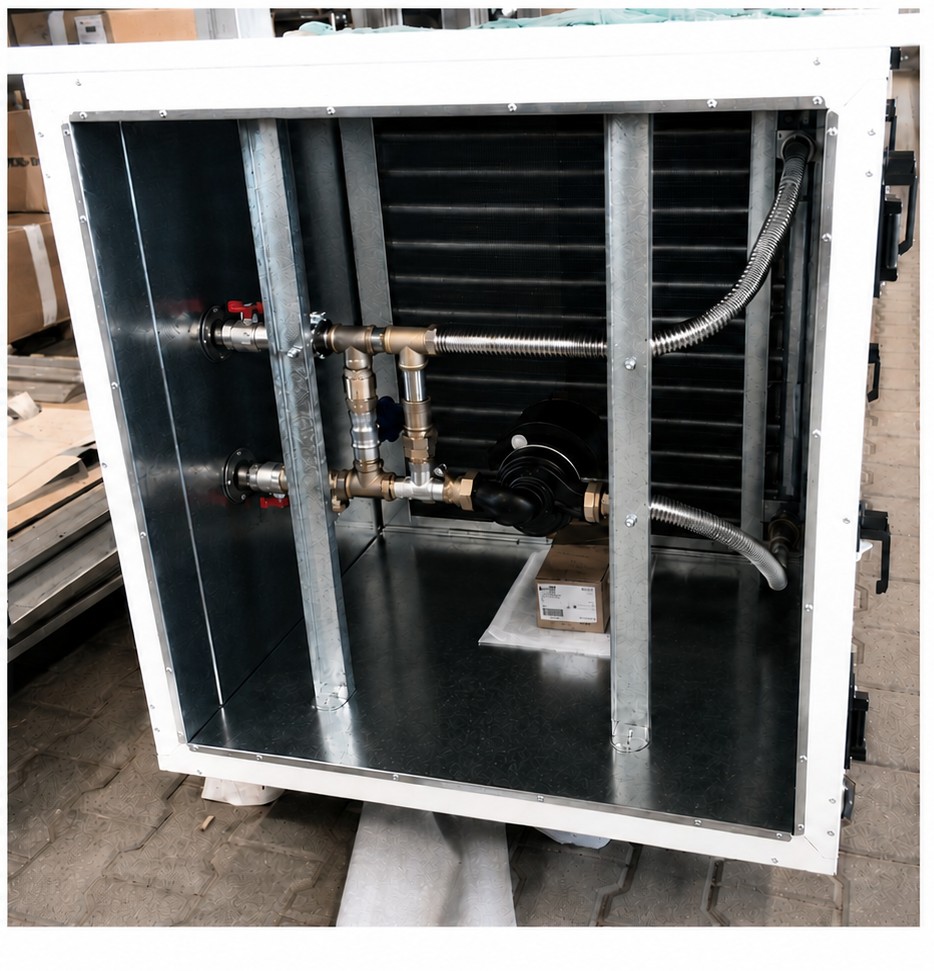
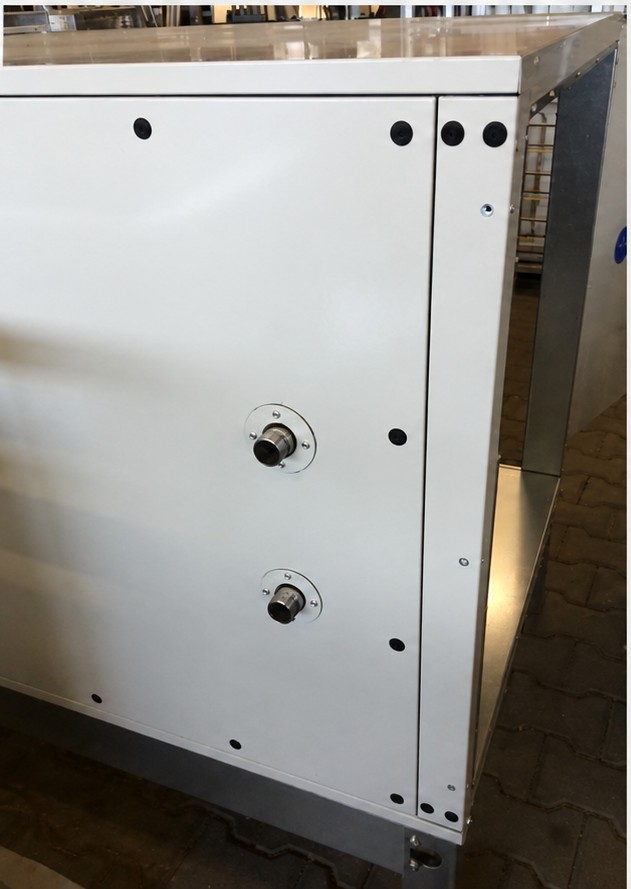
- Route the connections through the chamber casing.
- The penetrations must be sealed so that they are airtight and thermally insulated.
¶ INSTALLATION OF CONDENSATE TRAPS
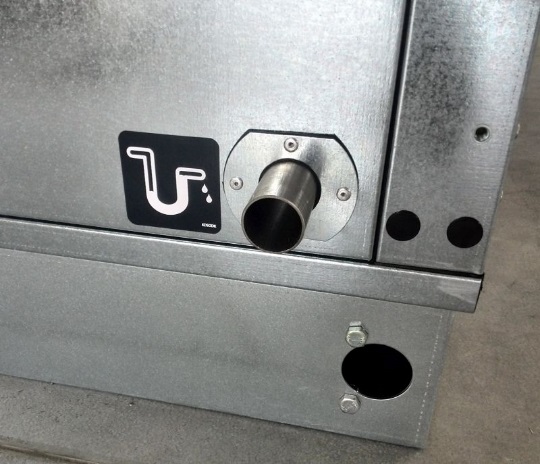
The condensate drain pans (cooler and heat recovery chambers) are fitted with DN32 outlets. The supplied condensate traps are sized for this dimension.
The designation of the condensate trap connection to the drain pan outlet is shown in the following figure.
 |
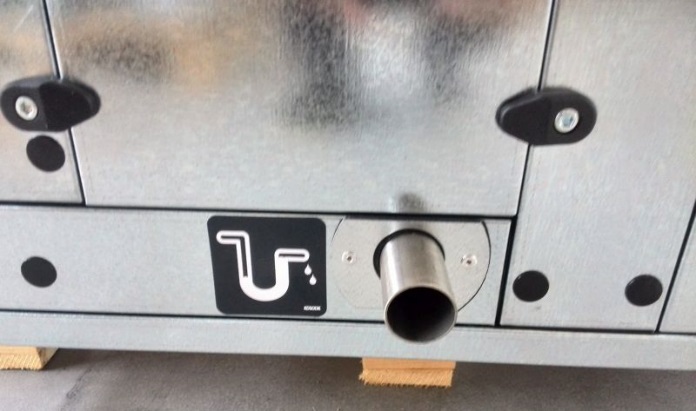 |
| Condensate outlet of the plate heat recovery exchanger. | Condensate outlet of the cooler (water cooler/evaporator). |
All condensate drains must be connected through a condensate trap with a sufficient water seal height to ensure faultless operation.
A separate condensate trap must be connected to each outlet. The pipework downstream of the traps may be interconnected.
A condensate trap connected on the negative-pressure side must always be filled with water before commissioning and after an extended shutdown so that condensate can drain away.
The pipework downstream of the condensate trap must not discharge directly into the sewer pipe.
The height of the unit above the floor/ground level must always be adapted to the required condensate trap height (base frame, feet, steel frame, etc.).
If the condensate trap is installed outdoors, its routing must be frost-protected, for example by means of an electric heating cable.
If the heating cable is included in the delivery, a 2 m heating cable with an integral thermostat and plug and an outdoor socket are supplied. The measurement and regulation system only includes a residual-current device for the outdoor socket. The cable is controlled independently by its integral thermostat. It usually switches on at +3 °C and switches off when the temperature rises above +10 °C. The measurement and regulation system therefore does not control the heating cable.
Condensate traps are selected according to the pressure condition at the outlet within the unit configuration – either negative pressure or positive pressure. A negative-pressure or positive-pressure condensate trap is supplied according to the applicable pressure condition.
If the condensate trap is included in the delivery, its correct location can be determined from its type (HL136NGG/HL136.2), which corresponds to the condensate trap type stated in the Technical Documentation of the unit in the section for the relevant built-in component (cooler, evaporator, heat recovery unit, etc.).
In other cases (customer-supplied condensate trap), the pressure condition and the correct condensate trap type can be determined from the data in the enclosed Technical Documentation of the unit, in the section for the relevant built-in component. This section states the pressure condition (positive pressure/negative pressure) and its value in [Pa]. The pressure value is calculated on the basis of the local pressure losses of the relevant part of the unit, including the external pressure loss. During the unit design and technical approval, the external pressure loss is divided between the fan inlet and discharge sides. However, the actual installation must always be taken into account. If necessary, the external pressure loss must be redistributed and the condensate trap height adjusted accordingly.
The pressure condition at the condensate trap location can also be determined, for example, from the unit illustration in the enclosed Technical Documentation. The following figures show examples of how to determine the pressure condition.
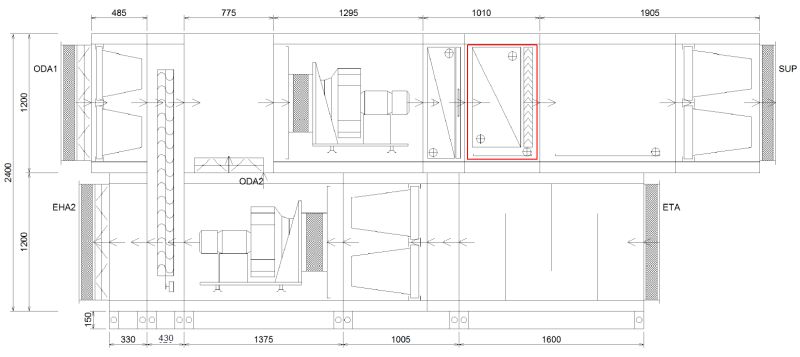
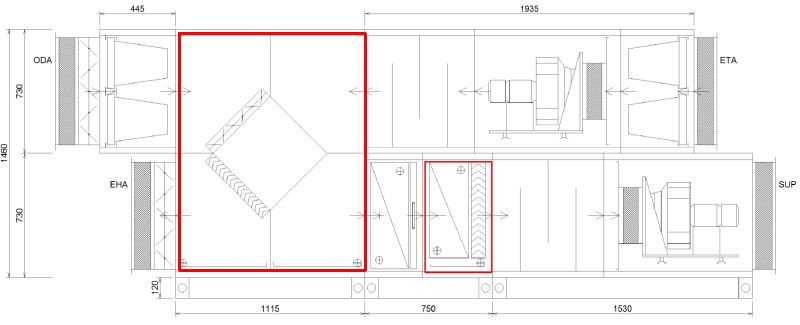
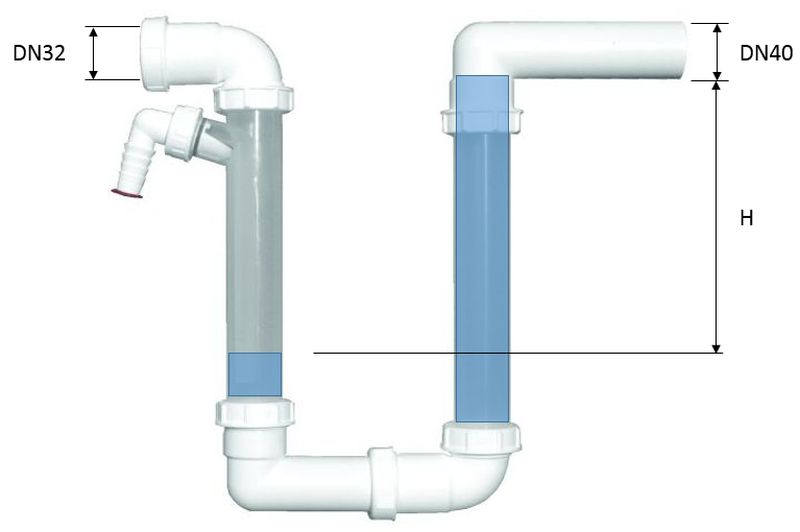
The correct condensate trap height setting according to the pressure value is as follows:
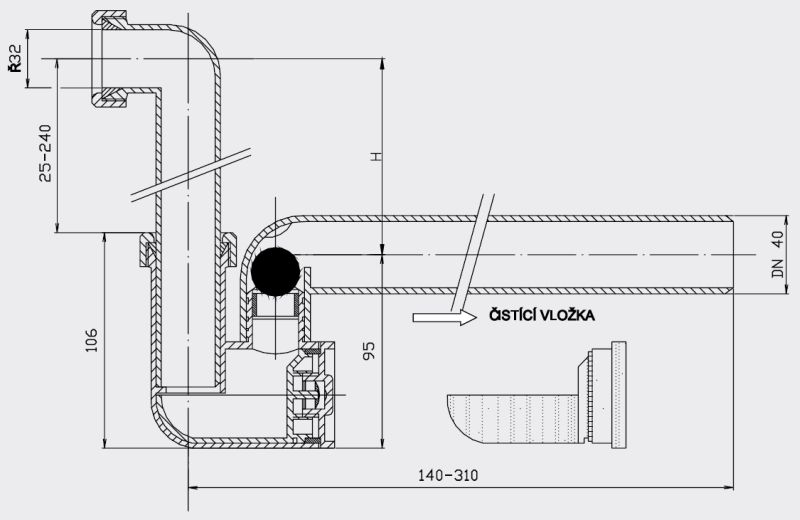
1) Negative-pressure condensate trap with ball HL136NGG
Suitable for negative pressure up to 2300 Pa.
Also suitable for positive pressure up to 500 Pa.
2) Transparent positive-pressure condensate trap HL136.2
Suitable for positive pressure up to 2000 Pa.
A DN40 to DN32 reducer for connection to the condensate drain is supplied with the condensate trap as standard.
¶ CONNECTION OF THE UNIT TO THE AIR DUCT
The unit may only be connected to the air duct by means of flexible connectors fitted to each end flange of the unit chamber. These connectors prevent the transmission of vibration.
The air duct must be connected free of mechanical stress, i.e. so that its weight does not load the flexible connector and consequently the chamber or the unit.
The flanged connection between the air duct and the flexible connector must always be properly sealed.
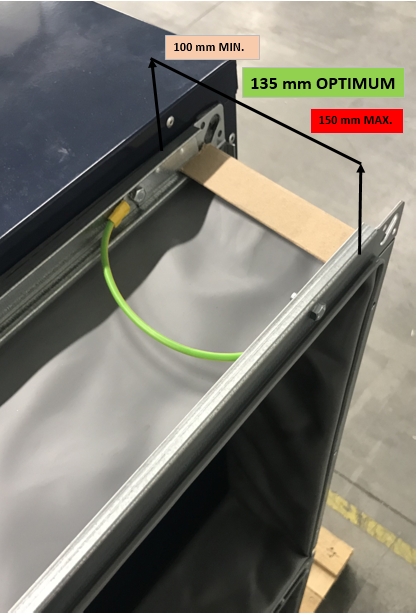
When connecting the air duct, observe the following permissible installation limits of the unit's flexible connector:
| 1) Standard flexible connector: | 2) Riveted (painted) flexible connector: |
|---|---|
 |
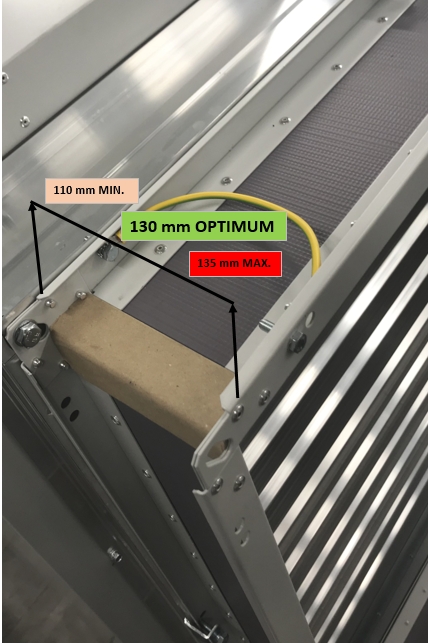 |
| Optimum installation length = 135 mm. | Optimum installation length = 130 mm. |
¶ INSTALLATION OF ACTUATORS
At the customer's request, the actuators can be factory-fitted when the order is placed, including electrical connection to the cable junction box. Otherwise, the recommended installation procedure is described below.
All dampers are fitted as standard at the factory with sheet-metal brackets for fastening the actuator.
The following damper arrangements are possible:
• End wall damper – external (on the chamber flange)/internal
• Damper chamber damper – external (on the chamber flange/on the walls)/internal
• Plate heat recovery exchanger bypass damper, vertical/horizontal – internal
• Pecín gas heater bypass damper – internal
• Monzun gas heater bypass damper – internal
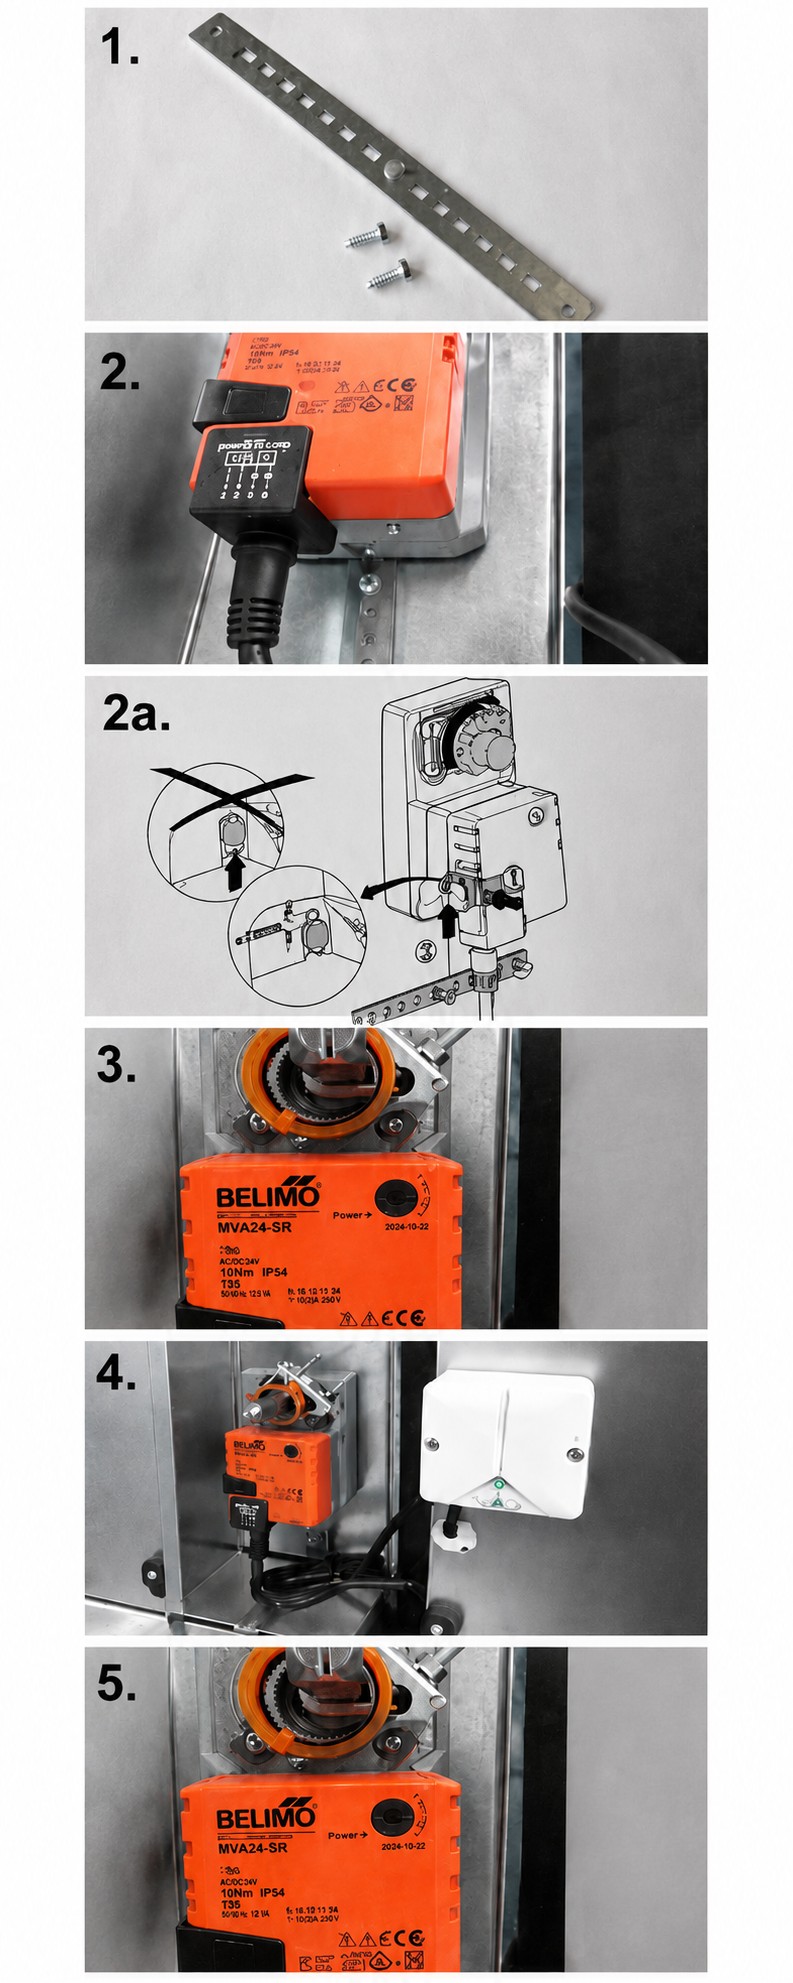
The recommended actuator installation procedure is as follows:
(Additional information on installation and electrical connection of the actuator can be found in the manufacturer's instructions included in the package.)
-
Modification of the actuator bracket
Cut the bracket immediately behind the pin used to secure the actuator.
Contents of the actuator package:
1× actuator bracket, 2× self-tapping screw -
Fastening the actuator + Figure 2a.
Position the shortened bracket vertically on the axis of the actuator fastening point.
Fasten the bracket to the sheet-metal bracket on the damper using two screws.
Insert the bracket pin into the actuator mounting hole in accordance with the detailed instructions included in the actuator package.
The figure also shows the second possible bracket mounting method – horizontal. -
Setting the actuator end stops
The actuator end stops are used to set the damper opening and closing angles.
As standard, the end stops are set for the fully open and fully closed damper positions. -
Installation of the cable junction box
Because the actuator cable is short, it must be routed to a junction box in order to connect the actuator to the measurement and regulation system control panel.
Depending on the actuator cable length, the junction box may be located outside or inside the chamber.
As standard, the chamber is factory-fitted with a cable gland for routing the actuator cable to the junction box. -
Testing the actuator for free movement and direction of rotation
Switch for changing the actuator opening direction (this can be checked after the electrical connection has been completed and an operating command has been issued by the measurement and regulation system).
Button for checking free damper movement independently of the actuator.
(press inwards)
Graphical representation of steps 1–5:
¶ CONNECTION OF THE CHAMBER LIGHTING SWITCH
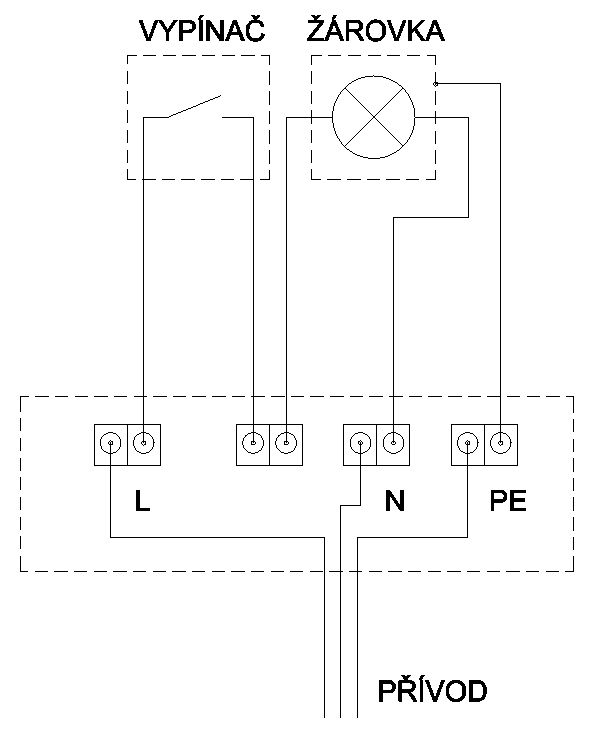
Chambers equipped with internal lighting are fitted as standard at the factory with a switch wired according to the following diagram: